
Pruning
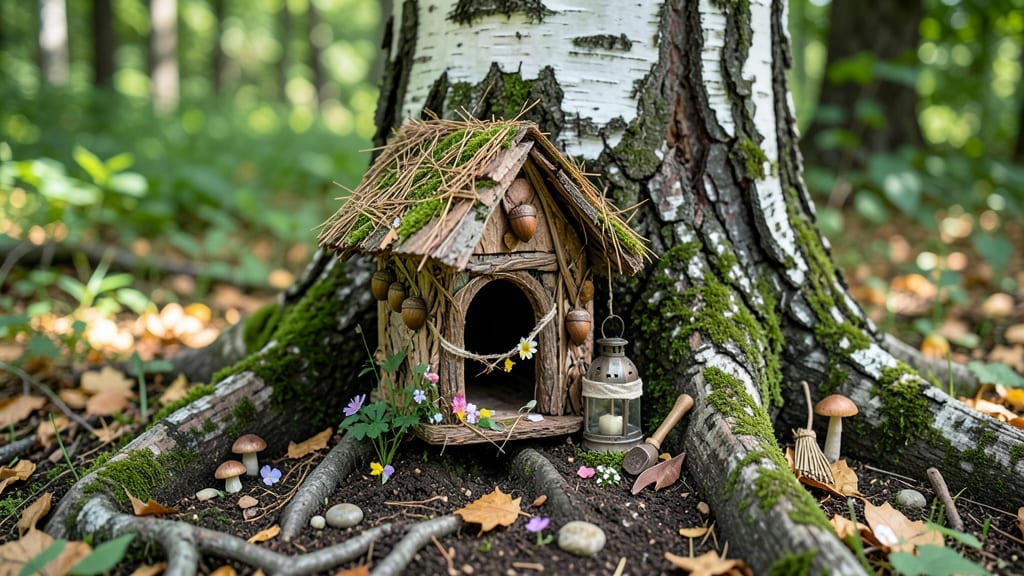
Transforming a tree trunk into a fairy house tree trunk creates a magical focal point that feels like stepping into a storybook. 🌿 The right spot—where sunlight filters through leaves and the bark has natural character—turns an ordinary garden corner into a whimsical hideaway.
I’ve built these for years, and the secret lies in blending materials so seamlessly that guests wonder if the fairies did it themselves.
You’ll need weatherproof materials like moss, twigs, and tiny pebbles to mimic nature’s textures, plus a few hand tools for shaping. The best tree trunks have crevices and rough bark that serve as built-in architectural features—no need for fancy construction.
Think of it as a puzzle where every piece (even the broken acorn caps) becomes part of the charm.
Once complete, your fairy house will cast enchanting shadows at dusk and become a magnet for children’s imaginations (or your own nostalgia). The key is keeping it simple: a tiny door, a thatched roof, and maybe a lantern made from a hollowed acorn.
Even the most basic design feels magical when placed under a canopy of leaves.
Works in any garden—woodland edges, children’s play areas, or even urban balconies with large planters. The best part? It ages beautifully, developing its own character as moss grows and seasons pass. Ready to bring a little fairy magic to your outdoor space?
📚 In This Guide
- What you need
- Instructions
- Tips and common mistakes
- Wrapping up and next steps
What you need
- ● Tree trunk or large branch: 4–12 inches in diameter (preferably dead or pruned for safety). Look for natural nooks, knots, or hollows for extra charm!
- ● Small roofing materials: Shingles, bark, or moss (for a rustic look)
- ● Miniature wooden planks or slate tiles (for a refined touch)
- ● Adhesives: EVA foam tape or hot glue (for lightweight roofing)
- ● Waterproof wood glue (for structural pieces)
- ● Decorative elements: Acrylic paint (non-toxic, weather-resistant)
- ● Miniature furniture (e.g., tiny chairs, tables, or doors)
- ● Natural embellishments (pebbles, twigs, or dried flowers)
- ● Tools: Pruning shears or handsaw (if trimming the trunk)
- ● Sandpaper (120–220 grit for smoothing edges)
- ● Paintbrushes (varied sizes for detail work)
- ● Fairy lights or solar-powered LED tea lights (for a glowing touch)
- ● Miniature garden tools (tiny rakes or watering cans)
- ● Clear sealant spray (to protect paint from weather)
- ● Moss or lichen (for a "lived-in" forest vibe)
Step-by-Step instructions for building a fairy house tree trunk
Transform a tree trunk into a magical fairy haven with these simple, creative steps.
🪴 Step 1: Select and Prepare Your Tree Trunk
Choose a 4-6 inch diameter tree trunk, preferably one with natural hollows or crevices for built-in fairy nooks. A fallen branch works perfectly—just make sure it's dry and free of pests. I like to sand down rough edges with medium-grit sandpaper to create a smooth surface where fairy furniture can sit securely.
Clean the trunk thoroughly with a damp cloth to remove dirt and debris. If you're using a fresh cut, let it dry in the sun for 24-48 hours before decorating. The natural wood grain adds texture, so embrace it—fairies love rustic charm! Mark any areas where you plan to add decorations with a pencil to keep your vision organized.
🌿 Step 2: Create the Fairy Foundation
Use small pebbles or moss to build the base of your fairy house. I collect smooth river rocks from my garden and arrange them in a circular pattern around the trunk’s base to mimic a fairy village foundation. Press them gently into the soil or a shallow tray if you’re placing this indoors.
For extra whimsy, tuck Spanish moss or shredded coconut fiber into the crevices of the trunk. This adds depth and makes the space look lived-in. Fairy houses thrive in cozy, hidden spots, so focus on filling the nooks and crannies—this is where the magic happens. If you’re using a tray, line it with landscape fabric first to prevent soil from spilling out.
✂️ Step 3: Add Fairy Furniture and Decor
Gather tiny toy furniture, acorns, pinecones, or bark slices to create a fairy-scale world. I like to use miniature wooden chairs, tables, and even tiny teacups from a dollhouse set. Arrange these in clusters near the trunk’s hollows or on flat surfaces. Fairy houses need functional spaces—think a tiny kitchen, a bed, or a gathering spot.
For doors and windows, use thin slices of bark, twigs, or even bottle caps painted in soft colors. Secure them with hot glue or small nails if needed. Add a tiny path made of twigs or a winding vine trail leading up to the trunk. Fairy paths should feel inviting, so keep them narrow and winding—just like a real fairy’s secret route!
☀️ Step 4: Bring It to Life with Lighting and Final Touches
Place your fairy house in a shaded, partially sunny spot where dappled light creates a magical glow. If you’re building this indoors, use a small LED tea light (battery-operated for safety) to mimic fairy lanterns. I tuck these into crevices or behind furniture for a soft, enchanting effect.
Add the final touches with tiny flowers, feathers, or even glitter (sparingly!) to highlight special areas. Fairy houses come alive with movement, so consider adding a small solar-powered wind chime or a tiny mobile made from seed pods. Step back and admire your work—this is now a fairy’s home, and every detail matters!
💧 Step 5: Maintain and Enjoy Your Fairy Haven
Check your fairy house weekly to ensure decorations are secure, especially after rain or wind. Replace any moss that dries out or pebbles that shift. Fairy houses are meant to feel natural, so don’t be afraid to adjust elements as seasons change—swap summer flowers for autumn leaves or add a tiny snowdrift in winter.
Invite fairies to visit by leaving tiny offerings like dewdrops (water droplets), crumbs of bread, or even a miniature teacup filled with "fairy tea" (just water). Watch as your garden becomes a hub of imagination—children and adults alike will love spotting the hidden details. The best part? Your fairy house grows more magical with each new addition!
Tips & tricks for perfect fairy house tree trunk
Here's what I learned after building these enchanting garden pieces—tricks to make your fairy home truly magical.
Tree Trunk Selection: Look for branches with natural hollows or cracks—they create instant fairy nooks without extra work. I once used a perfectly smooth trunk and had to carve out spaces, which took twice as long. If you can't find natural hollows, use a small drill to create subtle indentations where furniture can nestle. The goal is to make the space feel like it's always been a fairy home, not something forced.
Drying Time Matters: That 24-48 hour drying period in Step 1 isn't just about removing moisture—it's about preventing mold and ensuring your decorations stick properly. I learned this the hard way when my first attempt with a damp trunk had moss slipping off within days. Place your trunk in direct sunlight during the day and bring it indoors at night if you're in a humid climate. You'll know it's ready when the wood feels cool to the touch and has no visible moisture.
Foundation Stability: When creating your pebble or moss base in Step 2, press the stones or moss firmly into place—especially if you're using a tray. I once built a foundation that looked perfect but shifted when my cat knocked against it. For extra security, use a dab of clear silicone adhesive on the bottom of larger rocks. This keeps everything in place while maintaining that natural look.
Seasonal Adaptations: The instructions mention seasonal changes, but here's how to make it work year-round: For winter, add tiny "snow" using crushed white styrofoam or cotton balls tucked into crevices. In summer, you can incorporate real dewdrops by lightly misting the moss with water in the morning. I also keep a small spray bottle handy to refresh any dried elements between weekly checks—fairies appreciate a well-maintained home!
Pro Tips for Fairy House Tree Trunk
- Here's what I learned after building these enchanting garden pieces—tricks to make your fairy home truly magical.
- Tree Trunk Selection: Look for branches with natural hollows or cracks—they create instant fairy nooks without extra work.
- Drying Time Matters: That 24-48 hour drying period in Step 1 isn't just about removing moisture—it's about preventing mold and ensuring your decorations stick properly.
Frequently asked questions
Got questions about creating your own fairy house tree trunk? You’re not alone! Here are some of the most common queries—plus quick, practical answers to help you craft the perfect magical hideaway.
What’s the best type of tree trunk for a fairy house?
A hollowed-out tree trunk works best—think of deadfall, fallen branches, or even a small stump with natural crevices. Avoid live trees (it’s unethical and unsafe!). Look for softwoods like pine or fir, which carve easier than hardwoods like oak. Pro tip: Choose a trunk with natural nooks for instant charm!
How long does it take to build a fairy house tree trunk?
That depends on your skill level! A simple design with basic carvings and moss might take 1–2 hours, while intricate details (like tiny doors or windows) could stretch to 4–6 hours. Don’t rush—fairy houses are meant to be magical, not rushed!
What if I don’t want to carve—are there alternatives?
Skip the carving and try:
- Natural hollows: Use a fallen log with existing cavities as-is.
- Moss & bark: Layer moss, lichen, or bark to create texture without tools.
- Miniature furniture: Build a tiny “house” around the trunk with twigs and pebbles.
How do I keep pests out of my fairy house?
Fairy houses are tiny, so pests (like ants or spiders) might take interest. Prevent intruders with:
- Seal wood with non-toxic wood glue or beeswax to deter chewing.
- Add a moat of pebbles or a ring of citrus peels (pests dislike the scent!).
- Elevate the trunk slightly with rocks to reduce ground-level pests.
Will my fairy house tree trunk survive rain or snow?
Outdoor fairy houses need weatherproofing! Seal the wood with waterproof glue or clear varnish, and reinforce moss with spray adhesive. For snow, angle the trunk slightly to shed weight, or place it under a small overhang (like a bent branch). Pro tip: Add a tiny “umbrella” (a leaf or twig) for extra whimsy!
Wrapping up and next steps
Transforming a tree trunk into a fairy house isn’t just about creativity—it’s about bringing magic to your garden in the most natural way possible.
Whether you’re a seasoned crafter or a beginner, this project lets you blend artistry with outdoor charm, creating a whimsical retreat that sparks joy and wonder. 🌿✨
Ready to take the next step? Gather your tools, pick your perfect tree trunk, and let your imagination run wild! Share your fairy house masterpiece with friends or even turn it into a family project—every branch and detail tells a story. Happy crafting!